Building Applications
Event Action Mapping
Event Action Mapping is Structr’s declarative approach to handling user interactions. It connects DOM events directly to backend operations. When a user clicks a button, submits a form, or changes an input field, Structr can respond by creating, updating, or deleting data, calling methods, or navigating to another page.
Basics
An Event Action Mapping defines a flow: when an event fires (like click or submit), Structr executes an action (like creating an object or calling a method) with the configured parameters (mapped from input fields or expressions), and then performs a follow-up action (like navigating to another page or refreshing part of the UI).
Elements with Event Action Mappings are marked with an orange icon in the Active Elements tab. The icon resembles a process diagram, reflecting the flow-based nature of the mapping.
Why Event Action Mapping
In traditional web development, handling user interactions requires multiple layers: JavaScript event listeners on the client, API endpoints on the server, and code to connect them. Frameworks help manage this complexity, but you still need to understand their abstractions, maintain the code, and keep client and server in sync.
Event Action Mapping takes a different approach. You configure what should happen when an event fires, and Structr handles the communication between client and server. This keeps the simplicity of server-side rendering while adding the interactivity users expect from modern web applications. Because the configuration is declarative, you can see at a glance what each element does - the behavior is defined directly on the element in the Pages area, not scattered across separate code files.
Debouncing
Event Action Mapping automatically debounces requests. When multiple events fire in quick succession, Structr waits until the events stop before sending the request. This prevents duplicate submissions when a user accidentally double-clicks a button or types quickly in an input field with a change or input event.
The Frontend Library
To enable Event Action Mapping, your page must include the Structr frontend library:
<script type="module" defer src="/structr/js/frontend/frontend.js"></script>
This script listens for configured events and sends the corresponding requests to the server. The page templates included with Structr already include this library, so you only need to add it manually if you create your own page template from scratch.
Events
Events are DOM events that trigger an action. You configure which event to listen for on each element.
Configuring an Event
To add an Event Action Mapping, select an element in the page tree and open the Event Action Mapping panel. Select the event you want to react to - for example click for a button or submit for a form. Then configure the action, parameters, and follow-up behavior.
Available Events
The input field provides suggestions for commonly used events like click, submit, change, input, keydown, and mouseover. You are not limited to these suggestions - the event field accepts any DOM event name, giving you full flexibility to react to any event the browser supports.
Choosing the Right Event
The choice of event depends on the element and the desired behavior. For buttons, click is the typical choice. For forms, you usually listen for submit on the form element rather than click on the submit button. For checkboxes and radio buttons, use change instead of click - the value only updates after the click event completes.
Auto-Save Input Fields
Event Action Mapping does not require a <form> element. You can wire up individual input fields to save their values independently, for example by listening for change on each field and triggering an update action. This allows for auto-save interfaces where each field saves immediately when the user makes a change.
When you bind an Event Action Mapping directly to an input field, you do not need to configure parameter mapping. If the field has a name attribute, it automatically sends its current value with that name as the parameter. This makes auto-save setups particularly simple - just set the field’s name to match the property you want to update.
For example, consider a project detail page with two independently saving fields:
<input type="text" name="name" value="${current.name}">
<input type="text" name="description" value="${current.description}">
Each input gets its own Event Action Mapping: set the event to change, the action to “Update object”, and the UUID to ${current.id}. No parameter mapping is needed - Structr reads the field’s name attribute and current value automatically. When the user changes a field and moves to the next one, the value is saved immediately.
Actions
Actions define what happens when an event fires. Each action type has its own configuration options. Most actions require parameters to specify which data to send to the server.
Data Operations
Data operations create, modify, or delete objects in the database.
Create New Object
Creates a new object in the database. You specify the type to create in the “Enter or select type of data object” field and map input fields to the object’s properties using the parameter mapping. Each parameter name corresponds to a property on the new object.
Example: Create Form
The following example shows how to configure a simple form that creates a new Project. The figure below illustrates the form’s element hierarchy in the page tree and the corresponding HTML.
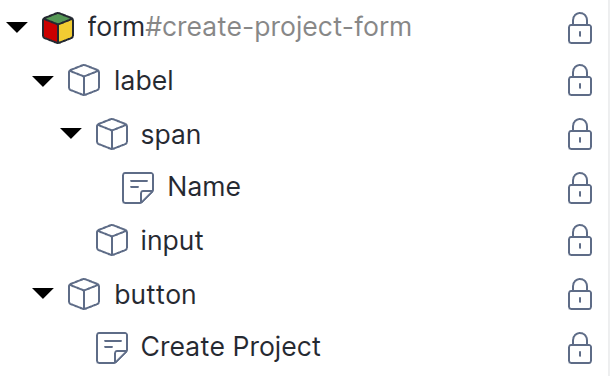
<form id="create-project-form">
    <label>
        <span>Name</span>
        <input type="text" name="name" required>
    </label>
    <button type="submit">Create Project</button>
</form>
The page tree shows the structure, but not the behavior. To make the form actually create a Project, you need to configure an Event Action Mapping on the <form> element.
Select the form element in the page tree and open the Event Action Mapping panel. Then configure the mapping step by step:
- Set the Event to
submit. This triggers the action when the user submits the form. - Select “Create new object” as the Action.
- In the type field, enter
Project. This is the type of object that will be created. - Under Parameter Mapping, click the plus button to add a parameter. Set the name to
nameand the type to “User Input”. A drop area appears - drag the input field from the page tree onto it. This links the parameter to the input field, so the value the user enters becomes thenameproperty of the new Project. - Under Behavior on Success, select “Navigate to a new page” and enter
/project/{result.id}in the “Success URL” input field.
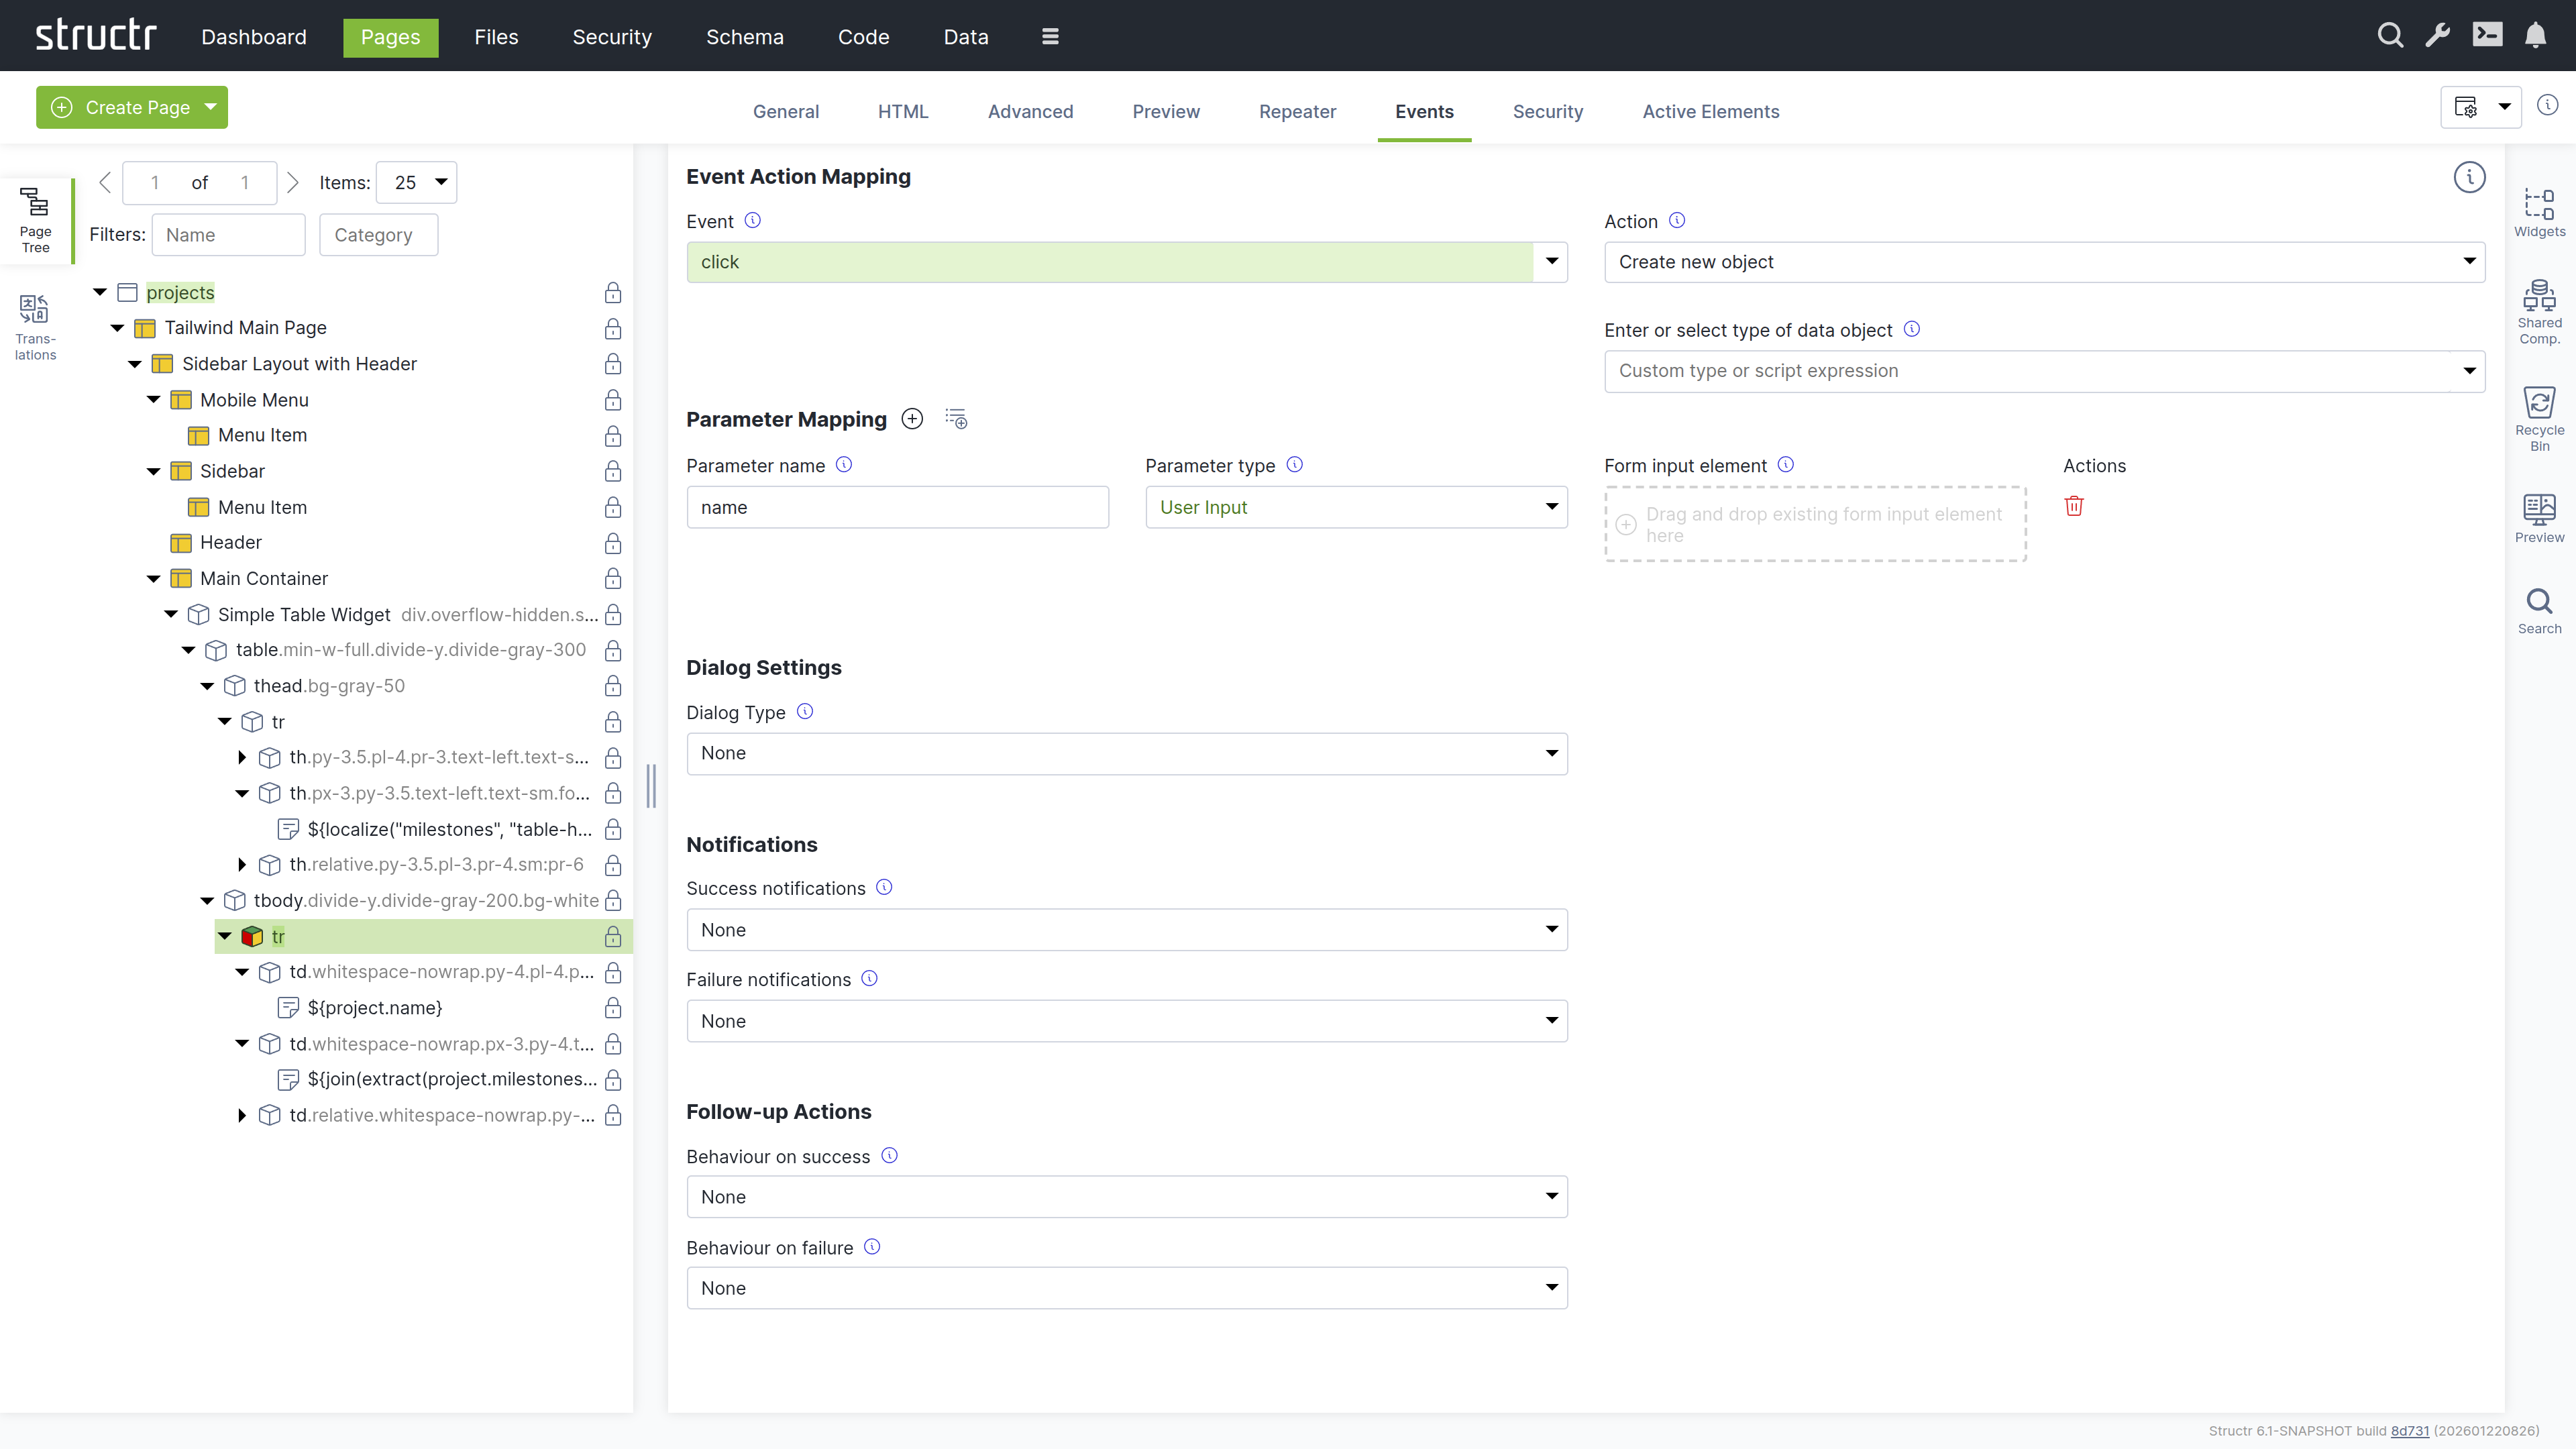
The completed configuration looks like this:
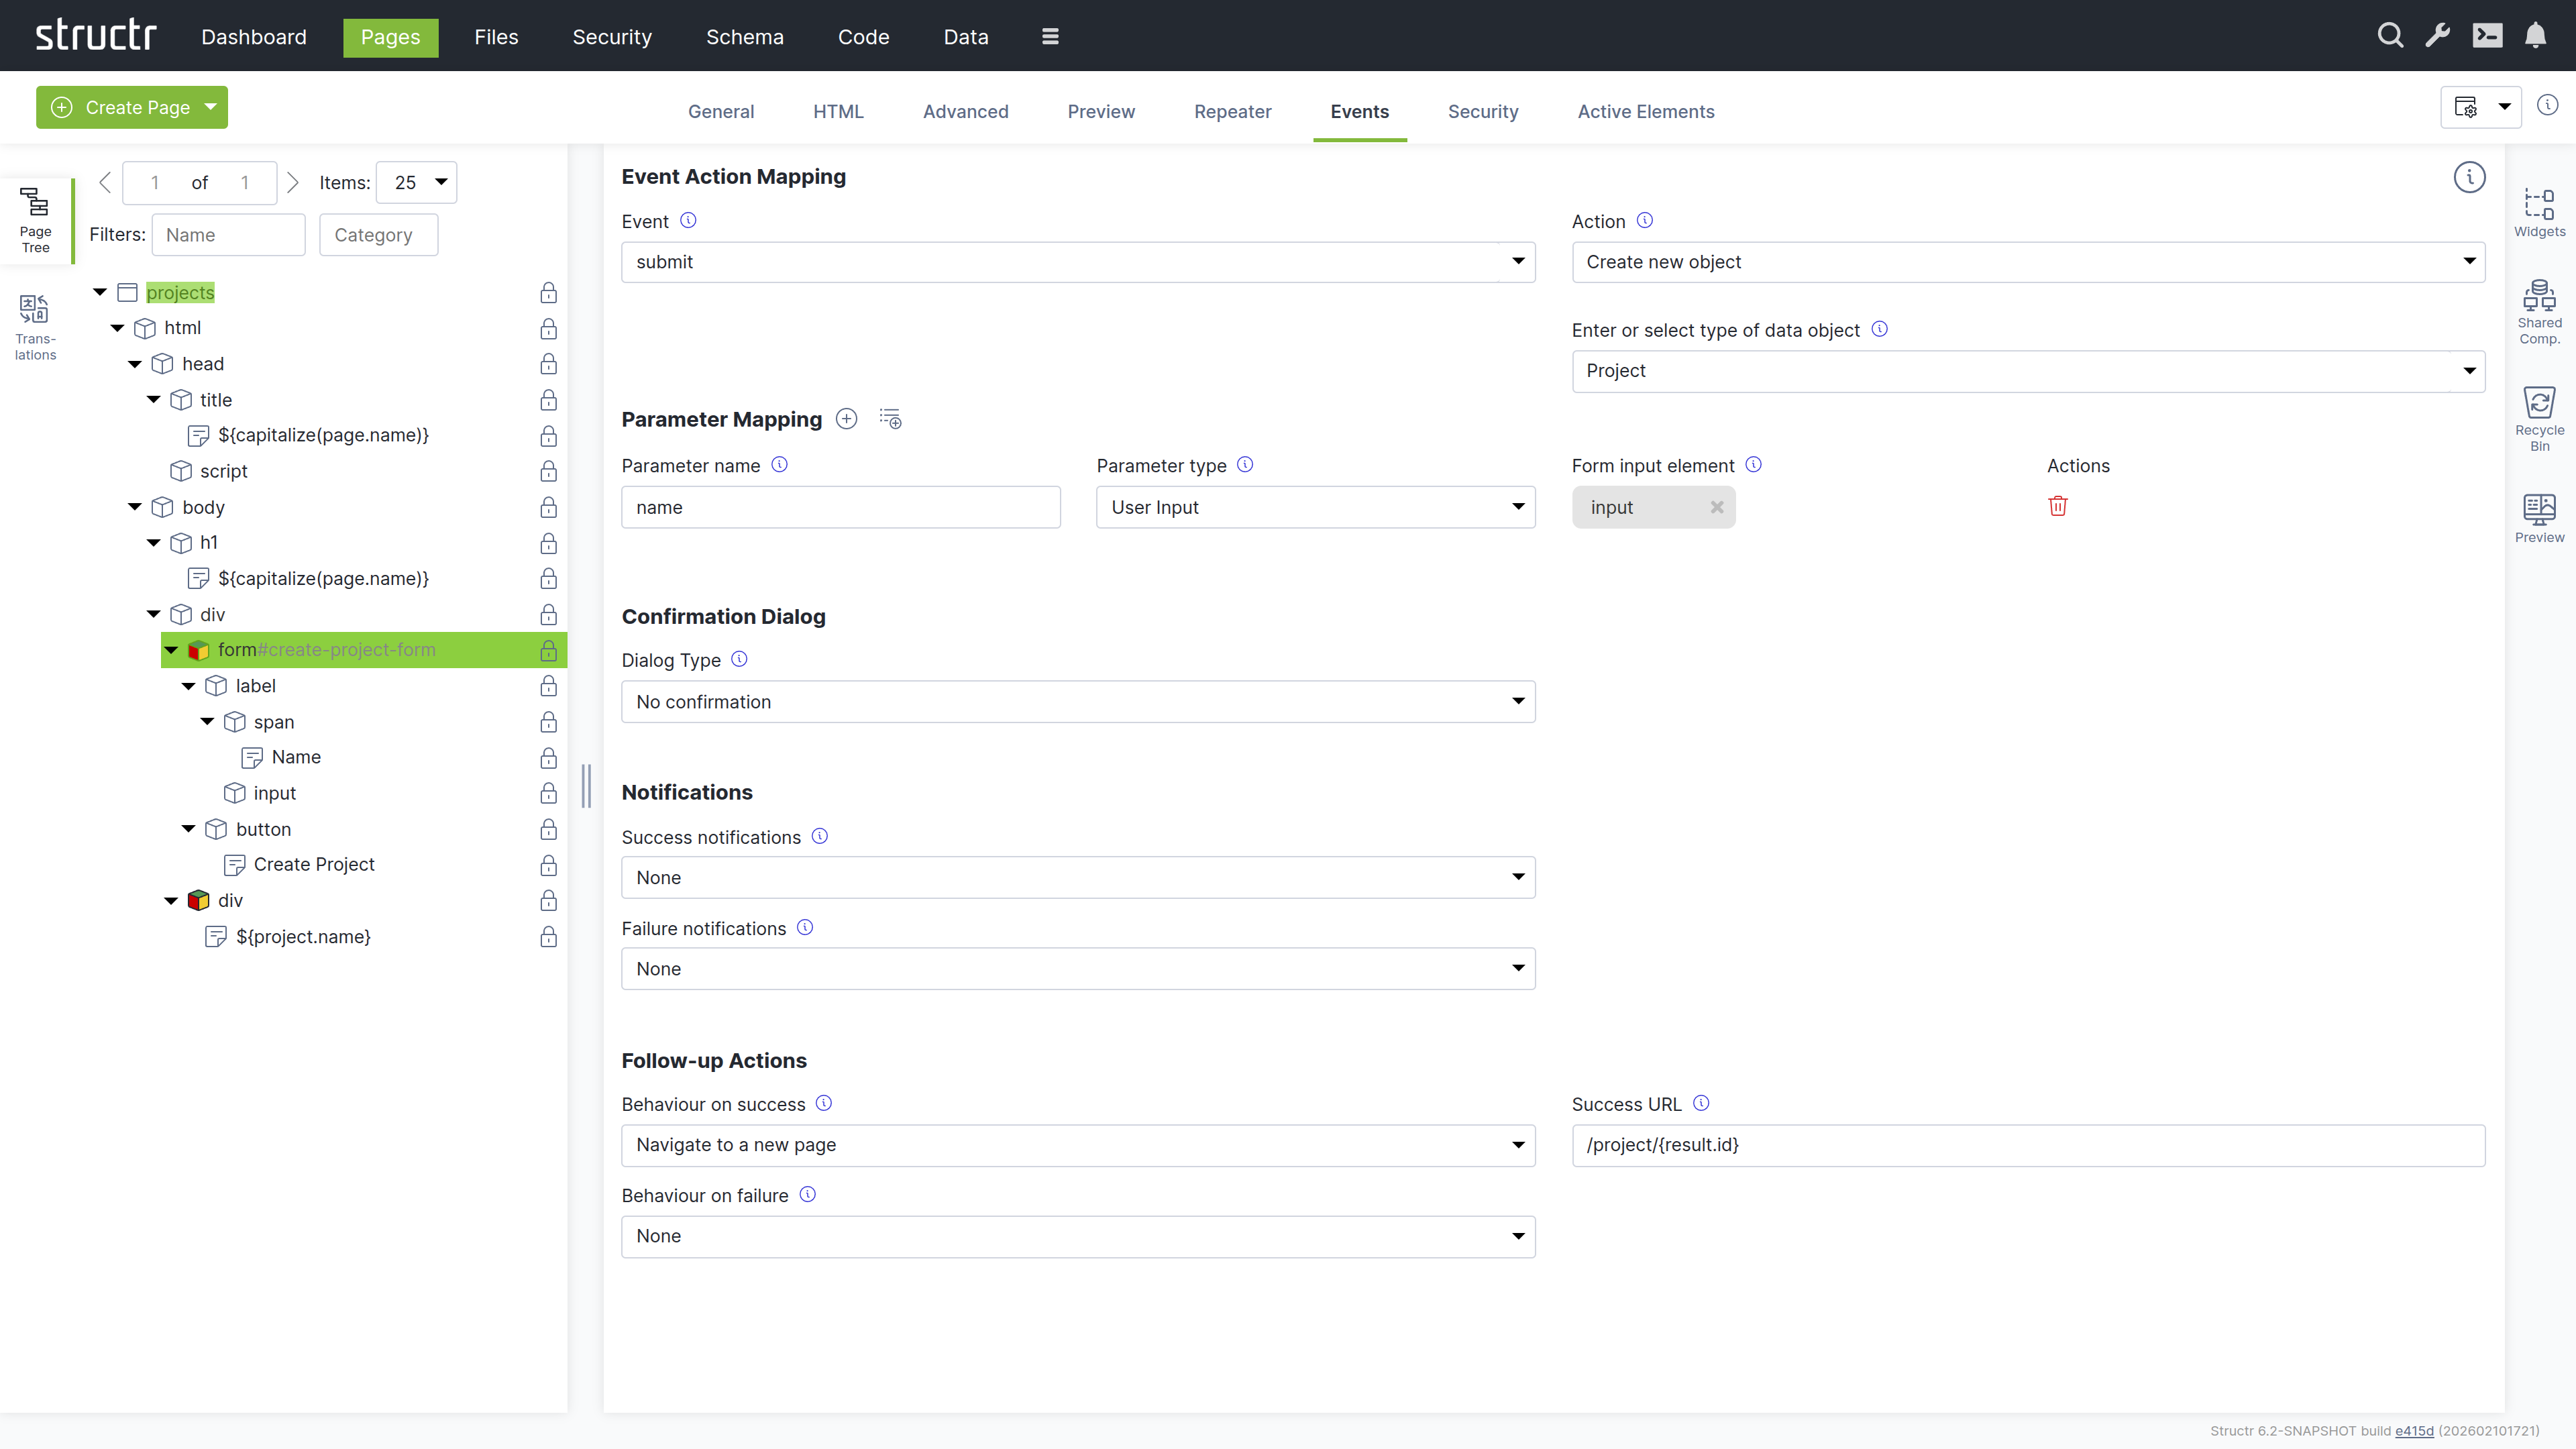
When a user fills in the form and clicks “Create Project”, Structr creates a new Project object with the entered name and redirects the browser to the edit page of the project.
Dynamic Type Selection
Note that you can also enter AbstractNode as the type and pass a parameter named type to determine the actual type at runtime. This is useful when a form can create different types of objects depending on user input.
Update Object
The Update Object action updates an existing object in the database. You enter a template expression in the “UUID of data object to update” field that resolves to the UUID of the object you want to update, for example ${current.id}. Note that this field is not an auto-script field, so you need to include the ${...} wrapper.
The configured parameter mapping determines which properties are updated. Each parameter name corresponds to a property on the object - only the mapped properties are modified, other properties remain unchanged.
Example: Edit Form
To let users modify existing data, you usually build an edit form. With the Event Action Mapping in Structr, you simply add an input field for each property you want to edit and set each input field’s value to the corresponding property using a template expression, for example ${current.name}. When the user submits the form, the Event Action Mapping sends the modified values back to the server. For details on dynamic attribute values, see the Dynamic Content chapter.
The following example shows the configuration of an edit form for a Project with multiple field types. The page is accessible at /project/{id} where {id} is the project’s UUID. Structr automatically resolves the UUID and makes the project available as current. For details on URL resolution, see the Navigation & Routing chapter.
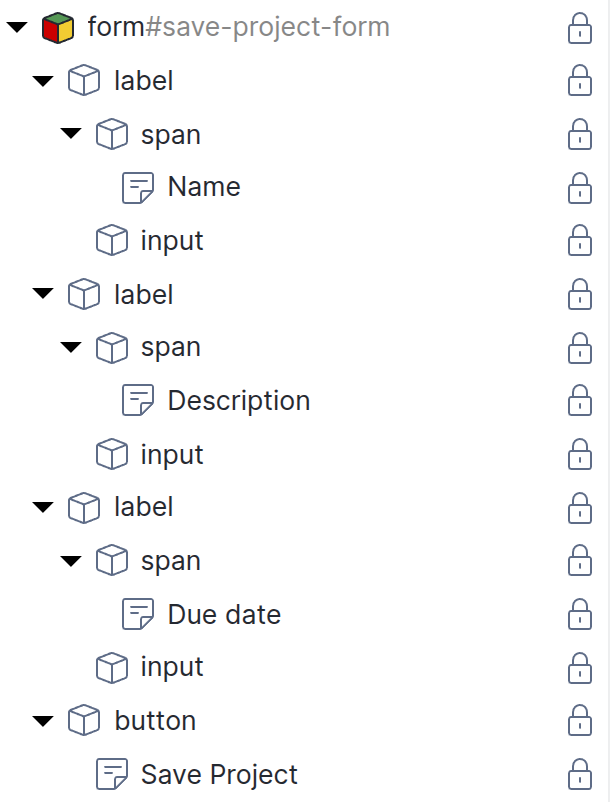
<form id="edit-project-form">
    <label>
        <span>Name</span>
        <input type="text" name="name" value="${current.name}">
    </label>
    <label>
        <span>Description</span>
        <input type="text" name="description" value="${current.description}">
    </label>
    <label>
        <span>Due Date</span>
        <input type="date" name="dueDate" value="${dateFormat(current.dueDate, 'yyyy-MM-dd')}">
    </label>
    <button type="submit">Save Project</button>
</form>
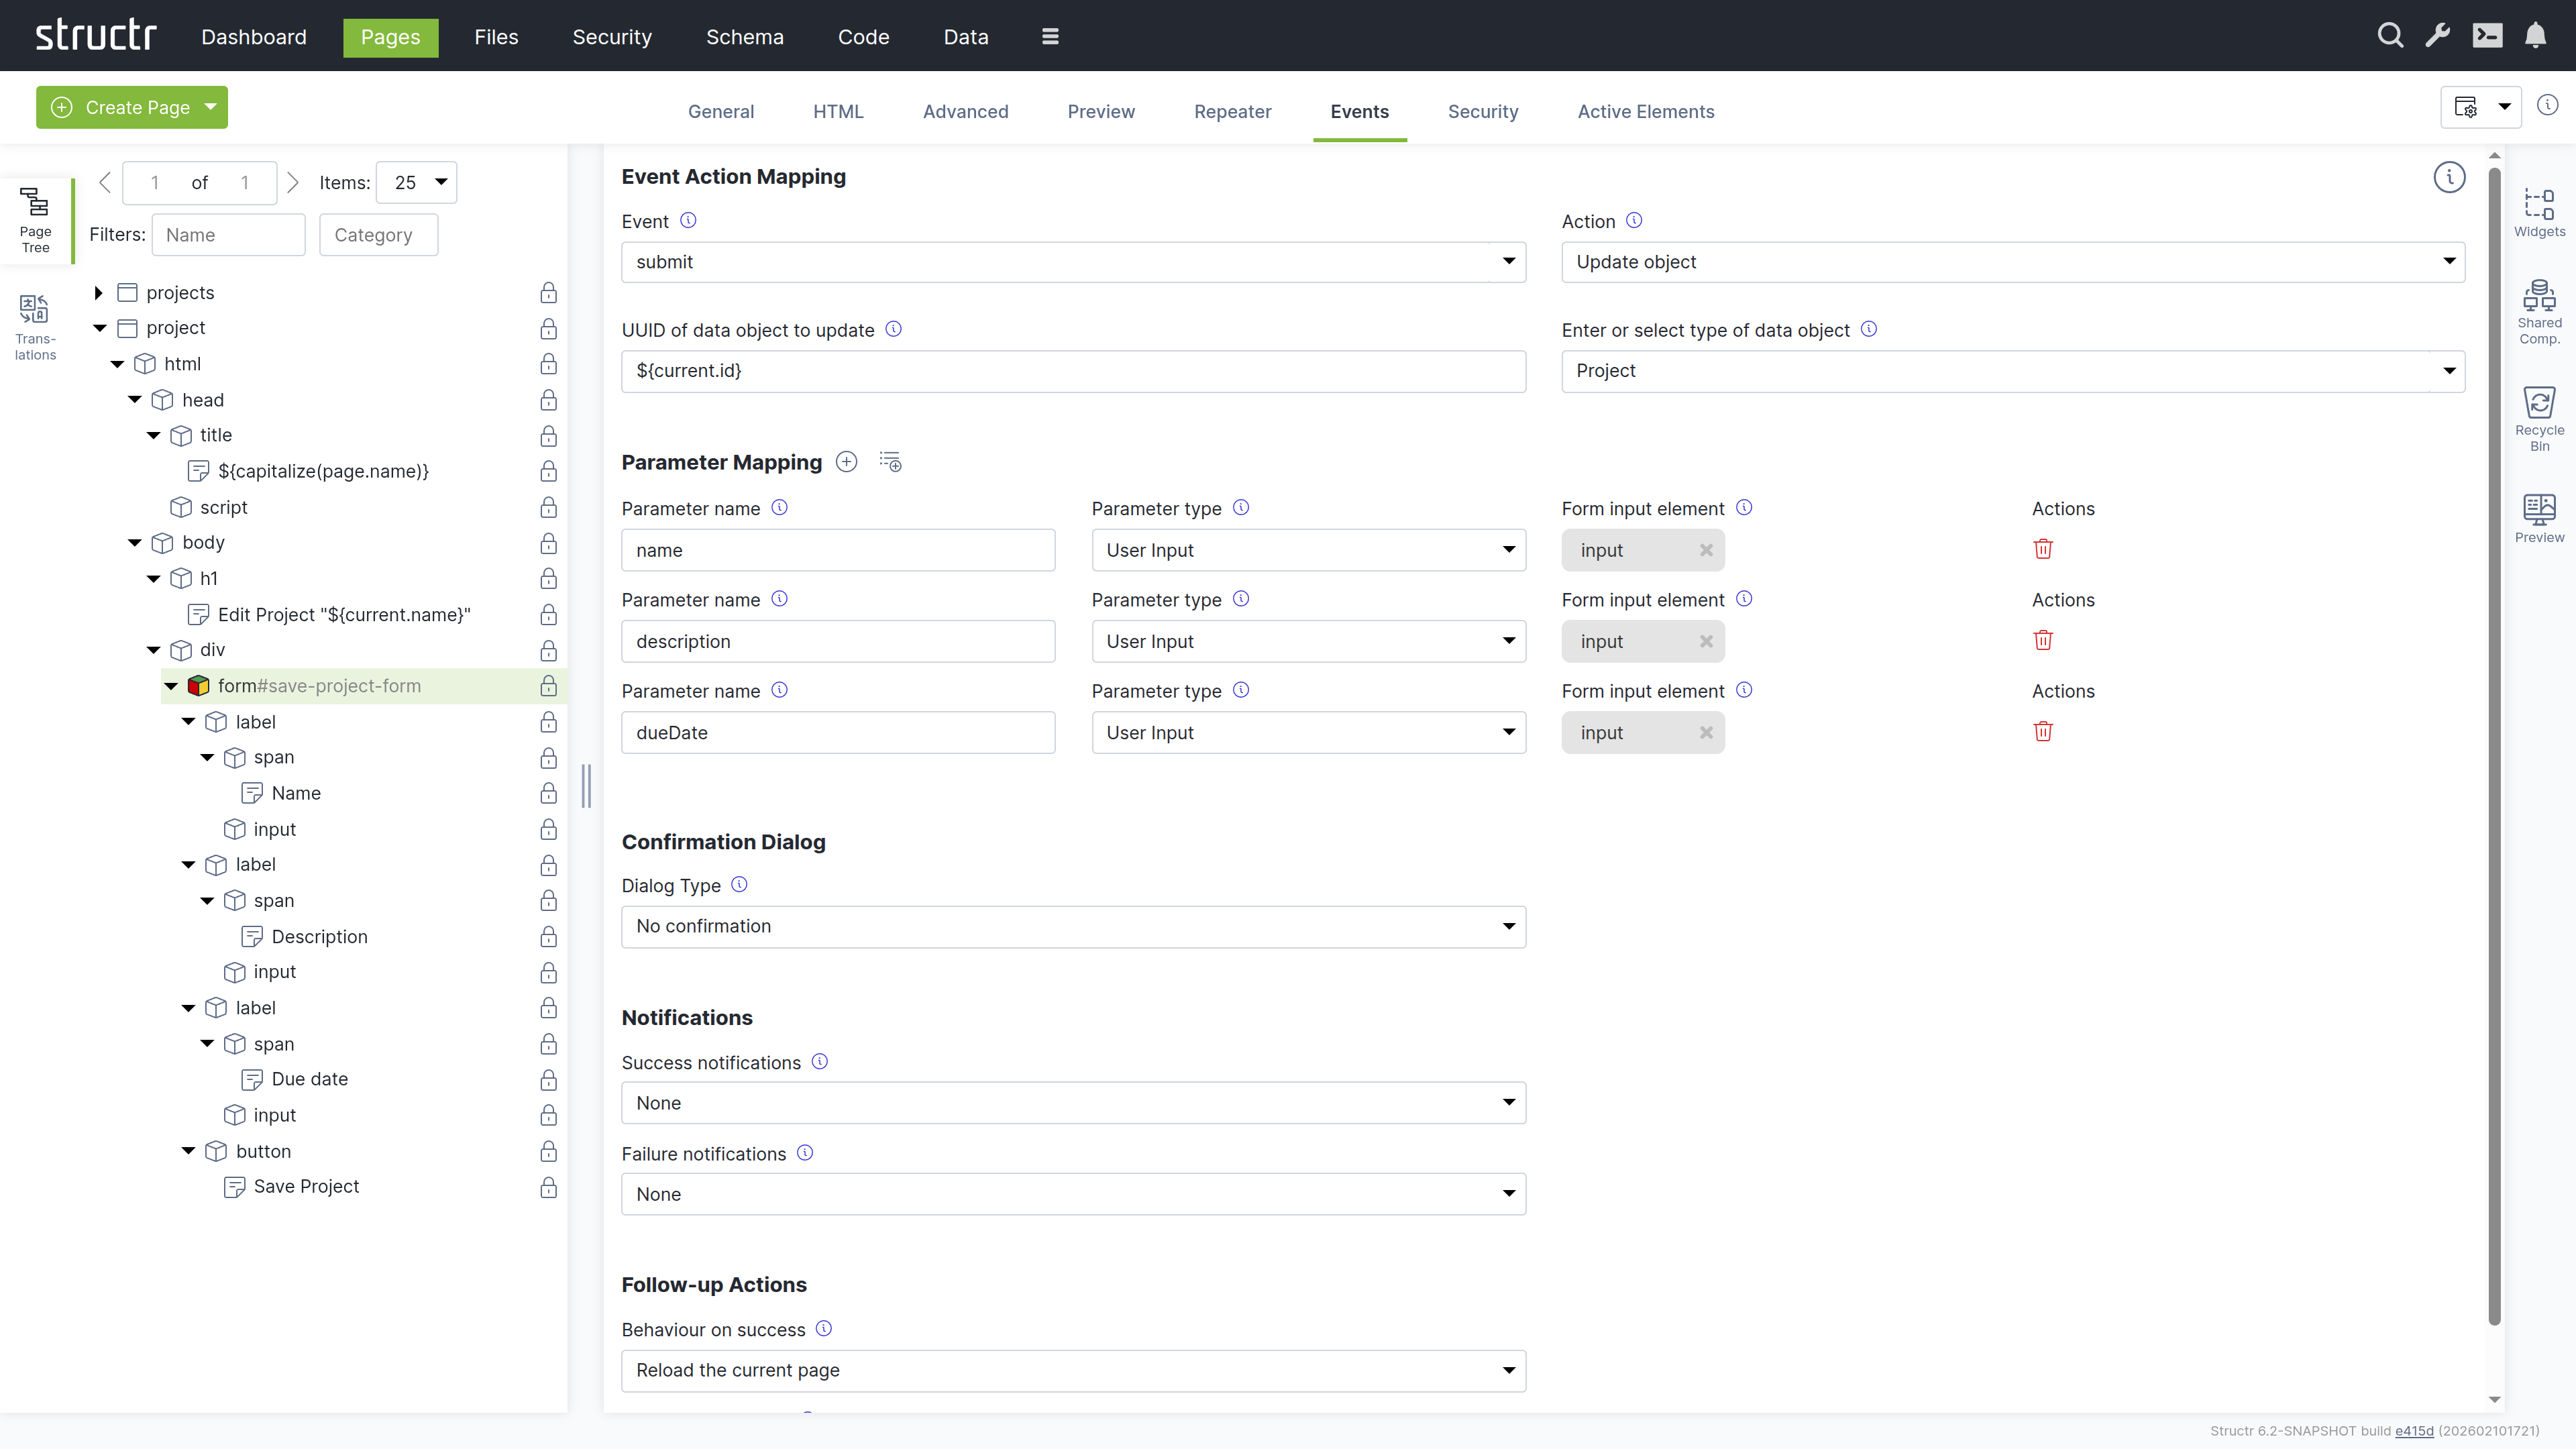
Select the form element in the page tree and open the Event Action Mapping panel. Then configure the mapping step by step:
- Set the Event to
submit. This triggers the action when the user submits the form. - Select “Update object” as the Action.
- In the UUID of data object field, enter
${current.id}. This is the UUID of the object we want to edit. - In the type field, enter
Project. This is the type of object that we expect to edit. - Under Parameter Mapping, click the plus button to add parameters for each of the properties. Set the name to the name of the property, and the type to “User Input”. A drop area appears - drag the input field from the page tree onto it. This links the parameter to the input field.
- Under Behavior on Success, select “Reload the current page”.
The Action Mapping configuration looks like this:
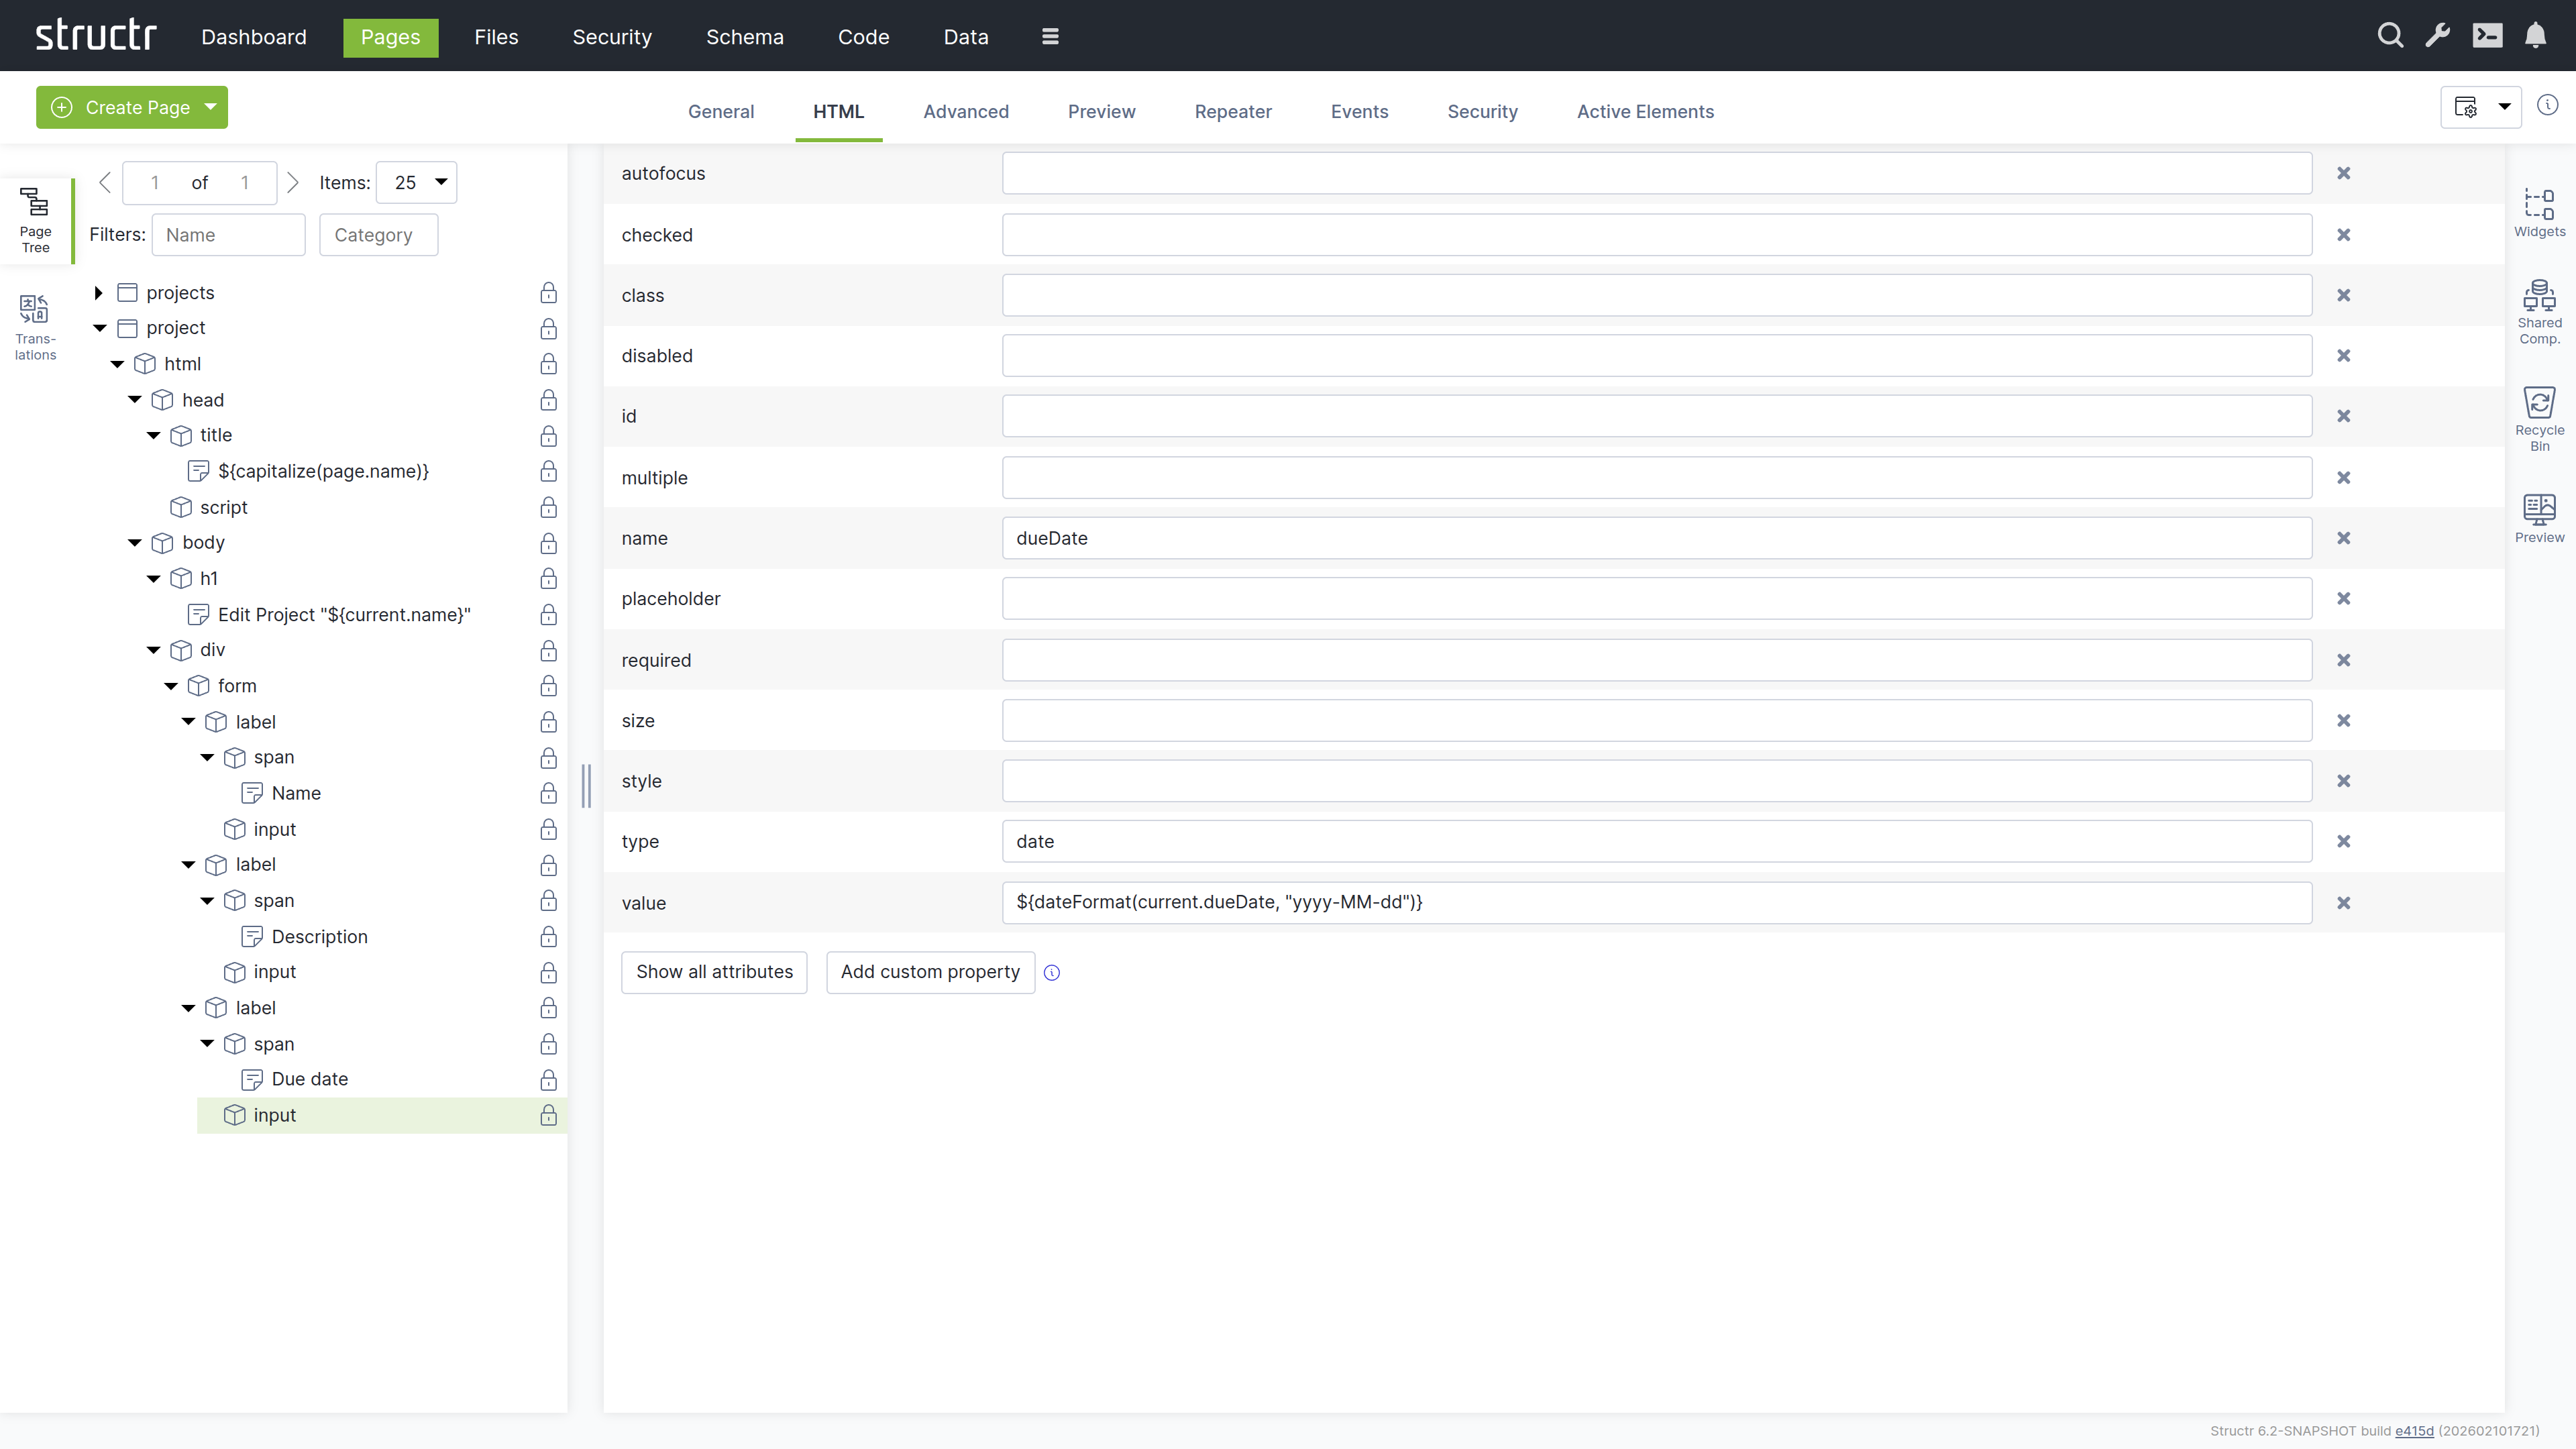
Each input has a value attribute with a template expression that loads the current value. The date field uses dateFormat() to convert to the HTML date input format. The configuration of a single input field looks like this:
Edit Forms with Other Input Types
The example above uses text and date inputs, which load their current values via the value attribute. For <select> elements, Structr provides a different mechanism: the Selected Values Expression field on the General tab of <option> elements. This field accepts a template expression that resolves to the currently selected value or values. Structr automatically compares the result with each option’s value attribute and sets the selected attribute on matching options.
For to-one relationships, the expression points to the single related object, for example current.manager. For to-many relationships, it points to the collection, for example current.tags. Structr handles both cases automatically. The Advanced Example at the end of this chapter demonstrates this for all four relationship cardinalities.
Delete Object
Deletes an object from the database. You enter a template expression in the “UUID of data object to delete” field that resolves to the object’s ID, for example ${current.id}. Note that this field is not an auto-script field, so you need to include the ${...} wrapper.
The delete operation removes only the specified object. Related objects are not automatically deleted - relationships are removed, but the related objects remain in the database.
Example: Delete Button in a List
Consider a list of projects rendered by a repeater. The repeater has a data key like project, and each row contains a delete button:
<div id="project-list">
    <!-- repeater: find('Project'), data key: project -->
    <div>
        <span>${project.name}</span>
        <button class="delete-btn" title="Delete Project">🗑</button>
    </div>
</div>
To make the delete button work:
- Select the button element in the page tree
- Open the Event Action Mapping tab
- Set the event to
click - Set the action to “Delete Object”
- In the “UUID of data object to delete” field, enter
${project.id}- inside a repeater, the data key gives you access to the current object - Set the success follow-up action to “Refresh Page Sections Based on CSS Selectors”
- Enter
#project-listas the selector - this matches theidattribute of the element that contains the repeater
When a user clicks the delete button, Structr deletes the project and reloads the list. The container element needs an id attribute so the partial reload can find and refresh it.
Creating Related Objects Inline
When a form creates a new object that should belong to an existing object, you can use a hidden input to establish the relationship. The hidden input carries the UUID of the parent object, so Structr links the two automatically.
For example, a project page at /project/{id} might include a form to add tasks:
<form id="add-task-form">
    <input type="text" name="name" placeholder="New task..." required>
    <input type="hidden" name="project" value="${current.id}">
    <button type="submit">Add Task</button>
</form>
The Event Action Mapping on this form uses the “Create new object” action with type Task. When the user submits the form, Structr creates a new Task and sets its project relationship to the current project because the hidden input passes the project’s UUID as the project property.
Authentication
Authentication actions manage user sessions.
Sign In
Authenticates a user and starts a session. You provide two parameters: name or eMail to identify the user, and password for authentication. On success, the user is logged in and subsequent page requests have access to the user object via the me keyword. Use a success follow-up action to navigate to a protected area of your application.
If the user has two-factor authentication enabled, additional configuration is required. See the Security chapter for details on setting up the login process for these users.
Sign Out
Ends the current user session. This action requires no parameters. After sign out, the page is reloaded.
Sign Up
Creates a new user account. You provide two parameters: either name or eMail to identify the user, and password for authentication.
Reset Password
Initiates the password reset process for a user. You map an input field to the eMail parameter.
Pagination
Pagination actions navigate through paged data. They work together with the “Request Parameter for Page” parameter type to control which page of results is displayed.
To use pagination, you first need a repeater configured with paging. The function query uses the page() function with a request parameter:
find('Project', page(request.page!1, 10))
This query finds all projects, displays 10 per page, and reads the current page number from the page request parameter. The !1 specifies a default value of 1 if the parameter is not set.
To configure a pagination action, add a parameter with type “Request Parameter for Page” and set the parameter name to match the request parameter used in your function query (e.g. page). Configure a follow-up action to reload the element containing the paginated data.
Next Page
Increments the page number by one.
Previous Page
Decrements the page number by one, with a minimum of 1.
First Page
Sets the page number to 1.
Last Page
Sets the page number to a high value. Note that this does not calculate the actual last page based on the total number of records.
Custom Logic
Custom logic actions execute your own code.
Execute Method
Calls a method defined in your data model. You specify the UUID of the object on which to execute the method and the method name. Parameters you define in the mapping become available under $.arguments in the method body. The method’s return value is available in notifications and follow-up actions. For details on defining methods, see the Business Logic chapter.
Execute Flow
Executes a Structr Flow. You select the flow to execute and map parameters that become available as flow inputs. The flow’s return value is available in notifications and follow-up actions. For details on creating flows, see the Flows chapter.
Parameters
Parameters define which data is sent with an action. To add a parameter, click the plus button next to the “Parameter Mapping” heading. Each parameter has a name and a type that determines where the value comes from.
For Create New Object and Update Object actions, there is an additional button “Add parameters for all properties”. When you have selected a type, this button automatically creates parameter mappings for all properties of that type. This saves time when you need to map many fields at once.
User Input
Links to an input field on the page. When you select this type, a drop area appears where you can drag and drop an input element from the page tree. Structr automatically establishes the connection between the parameter and the input field.
When the action fires, Structr reads the current value from the input field. If the input field is inside a repeater, Structr automatically finds the correct element within the current repeater context.
Constant Value
A fixed value that is always sent with the action. Template expressions are not supported here, but you can use special keywords to send structured data:
json(...)- sends a JSON object, for examplejson({"status": "active", "count": 5})data()- sends data from the DataTransfer object of a drag and drop event, useful when handlingdropevents where the dragged element has attached JSON data
Evaluate Expression
A template expression that is evaluated on the server when the page renders. This allows you to include data that was already known at page render time - for example, the ID of the current object or request parameters. The field supports mixed content, so you need to use the ${...} syntax for expressions.
Request Parameter for Page
Used for pagination actions. When you select this type, the parameter name specifies which request parameter controls the page number. This works together with the pagination actions (Next Page, Previous Page, First Page, Last Page) to navigate through paged data.
When Parameters Are Evaluated
Understanding when each parameter type is evaluated is important for choosing the right type:
| Parameter Type | Evaluated | Use Case |
|---|---|---|
| User Input | When action fires | Form fields, user-entered data |
| Constant Value | Never (static) | Fixed values, JSON data |
| Evaluate Expression | When page renders | Object IDs, request parameters |
| Request Parameter for Page | When action fires | Pagination |
This distinction explains why the object UUID uses ${current.id} in the “UUID of object to update” field (evaluated at render time) while field values use “User Input” (evaluated at submit time).
Notifications
Notifications provide visual feedback to the user about whether an action succeeded or failed. You configure success notifications and failure notifications separately - each can use a different notification type, or none at all. If you do not configure a failure notification, failed actions fail silently without any feedback to the user.
None
No notification is shown. This is the default for both success and failure.
System Alert
Displays a browser alert dialog with a status message. The message includes the HTTP status code and the server’s response message if available:
✅ Operation successful (200)
❌ Operation failed (422: Unable to commit transaction)
Inline Text Message
Displays the status message on the page, directly after the element that triggered the action. You can configure the display duration in milliseconds, after which the message disappears automatically.
For validation errors, the specific error messages are included:
❌ Operation failed (422: Unable to commit transaction, validation failed)
test must not be empty
Additionally, the input element for each invalid property receives a red border and a data-error attribute containing the error type. On success, these error indicators are cleared automatically.
Custom Dialog Element Defined by CSS Selector
Shows an element selected by a CSS selector by removing its hidden class. The element is hidden again after 5 seconds. You need to define the hidden class in your CSS, for example with display: none.
You can specify multiple selectors separated by commas - each selector is processed separately. Note that for each selector, only the first matching element is shown. If you use a class selector like .my-dialog and multiple elements have this class, only the first one will be displayed.
This option does not have access to the result data - it simply shows and hides the element. Result placeholders like {result.id} are not available in the selector.
Custom Dialog Element Defined by Linked Element
Same as above, but instead of entering a CSS selector, you drag and drop an element from the page tree onto the drop target that appears when this option is selected.
Raise a Custom Event
Dispatches a custom DOM event that you can handle with JavaScript. You specify the event name in an input field. See the section “Custom Events” under Custom JavaScript Integration for details.
Notifications Display Fixed Messages
The built-in notification types (system alert, inline text message, custom dialog) display fixed messages and cannot include data from the action result. If you need to show result data in a notification - for example, displaying the name of a newly created object - use “Raise a Custom Event” and handle the display logic in JavaScript.
In contrast, follow-up actions support result placeholders like {result.id}. See the section “Accessing Result Properties” for details.
Follow-up Actions
Follow-up actions define what happens after an action completes. In the UI, these are labeled “Behavior on Success” and “Behavior on Failure”. You configure success and failure behavior separately - each can use a different follow-up action type, or none at all.
None
No follow-up action. This is the default for both success and failure.
Reload the Current Page
Reloads the entire page. This is the simplest way to ensure the page reflects any changes made by the action, but it loses any client-side state and may feel slow for users.
Refresh Page Sections Based on CSS Selectors
Reloads specific parts of the page selected by CSS selectors. Only the matched elements are re-rendered on the server and replaced in the browser. This is useful for updating a list after creating or deleting an item without reloading the entire page.
You can specify multiple selectors separated by commas. Unlike notifications, all matching elements are reloaded - if you use a class selector like .my-list and multiple elements have this class, all of them will be refreshed.
Result placeholders like {result.id} are not available here - the selectors are static and cannot depend on the action result.
Refresh Page Sections Based on Linked Elements
Same as above, but instead of entering CSS selectors, you drag and drop elements from the page tree onto the drop target that appears when this option is selected.
Navigate to a New Page
Navigates to another page. You enter a URL which can include result placeholders like {result.id}. A common pattern is to navigate to the detail page of a newly created object with a URL like /project/{result.id}.
Accessing Result Properties
You access properties from the action result using simple curly braces: {result.id}, {result.name}, and so on. Nested paths are also supported. The result contains all properties included in the type’s public view. For details on configuring views, see the Data Model chapter.
This syntax differs from template expressions, which use ${...} with a dollar sign. The distinction is intentional. Template expressions are evaluated on the server when the page renders - before the action runs and before any result exists. The curly brace placeholders are resolved on the client after the action completes.
Note that this placeholder syntax is only available in “Navigate to a New Page”. For “Refresh Page Sections”, result properties are passed as request parameters but cannot be used in the CSS selector. For “Raise a Custom Event”, the result is available in the event’s detail.result object.
Raise a Custom Event
Dispatches a custom DOM event that you can handle with JavaScript. You specify the event name in an input field. See the section “Custom Events” under Custom JavaScript Integration for details.
Sign Out
Ends the current user session and reloads the page. This is useful as a failure follow-up action when an action requires authentication - if the session has expired, the user is signed out and can log in again.
How Partial Reload Works
When you use “Refresh Page Sections”, only the selected elements are re-rendered on the server and replaced in the browser. Event listeners are automatically re-bound to the new content, and request parameters (for example from pagination) are preserved.
After a partial reload, the element dispatches a structr-reload event. You can listen for this event to run custom JavaScript after the content updates. If an input field had focus before the reload, Structr attempts to restore focus to the same field in the new content.
Validation
There are two approaches to validating user input: client-side validation before the request is sent, and server-side validation when the data is processed.
Client-Side Validation
For client-side validation, you can use standard HTML5 validation attributes on your form fields. Event Action Mapping automatically checks these constraints before sending the request - if validation fails, the browser shows an error message and the action is not executed.
HTML5 Validation Attributes
The following attributes are available:
required- the field must have a valuepattern- the value must match a regular expressionminandmax- for numeric rangesminlengthandmaxlength- for text length
Example:
<input type="text" name="name" required minlength="3" maxlength="100">
<input type="email" name="email" required>
<input type="number" name="budget" min="0" max="1000000">
Validation Events
HTML provides validation-related events that can be useful in combination with custom JavaScript:
invalid- fires when a field fails validationinput- fires when the value changes, useful for live validation feedbackchange- fires when the field loses focus after the value changed
These events are primarily useful for custom JavaScript validation logic, not for Event Action Mapping actions. For details on integrating custom JavaScript, see the Custom JavaScript Integration section.
Validation CSS Pseudo-Classes
The browser automatically applies CSS pseudo-classes to form fields based on their validation state:
:valid- the field value meets all constraints:invalid- the field value fails validation:required- the field is required:optional- the field is not required
You can use these pseudo-classes to style fields differently based on their validation state, for example showing a red border on invalid fields or a green checkmark on valid ones.
For more complex validation logic, you need to implement custom JavaScript.
Server-Side Validation
Server-side validation happens when the data reaches the backend. Structr validates the data against the constraints defined in your data model. If validation fails, the server returns an error response that you can display to the user using a failure notification.
Schema Constraints
The data model provides several validation options:
- Properties marked as not-null must have a value. Creating or updating an object without a required property fails with a validation error.
- Properties marked as unique must have a value that no other object of the same type has. This is useful for email addresses, usernames, or other identifiers.
- Multiple properties can be marked for compound uniqueness, ensuring their combined values are unique across all objects of the type.
- String properties can have a format pattern that the value must match, defined as a regular expression.
- Numeric properties can have minimum and maximum values.
Lifecycle Methods
For complex validation that goes beyond schema constraints, you can implement validation logic in lifecycle methods. The onCreate and onSave methods are called before an object is created or modified, allowing you to validate the data and throw an error if it is invalid. For details on lifecycle methods, see the Business Logic chapter.
Handling Validation Errors
When server-side validation fails, Structr returns an error response with details about which constraints were violated. You can display this information to the user using a failure notification.
The Inline Text Message notification type is particularly useful here because it displays each validation error with its property name and also marks the corresponding input elements with a red border. See the Notifications section for details.
Custom JavaScript Integration
Event Action Mapping covers the most common interaction patterns, but sometimes you need more control. Structr provides several ways to integrate custom JavaScript logic with Event Action Mapping.
Custom Events
The “Raise a Custom Event” option in notifications and follow-up actions allows you to break out of the Event Action Mapping framework. When configured, Structr dispatches a DOM event that you can listen for in your own JavaScript code.
You specify the event name in an input field. The event bubbles up through the DOM and includes a detail object with three properties:
result- the result returned by the actionstatus- the HTTP status codeelement- the DOM element that triggered the action
Example:
document.addEventListener('project-created', (event) => {
    console.log('New project ID:', event.detail.result.id);
    console.log('Status:', event.detail.status);
});
This lets you combine the simplicity of Event Action Mapping with custom logic - for example, using Event Action Mapping to handle form submission and data creation, then raising a custom event to trigger a complex animation, update a third-party component, or perform additional client-side processing.
Built-in Events
Structr automatically fires several events during action execution that you can listen for.
structr-action-started
Fired when an action starts executing. The event target is the element that triggered the action.
document.addEventListener('structr-action-started', (event) => {
    console.log('Action started on:', event.target);
});
structr-action-finished
Fired when an action completes, regardless of whether it succeeded or failed. The event target is the element that triggered the action.
document.addEventListener('structr-action-finished', (event) => {
    console.log('Action finished on:', event.target);
});
structr-reload
Fired after a partial reload completes. The event target is the element that was reloaded. This is useful for reinitializing JavaScript components or running setup code after content has been replaced.
document.addEventListener('structr-reload', (event) => {
    console.log('Element reloaded:', event.target);
});
CSS Class During Execution
While an action is running, the triggering element receives the CSS class structr-action-running. This class is added when the action starts and removed when it finishes. You can use this to style elements during execution - for example, to show a loading indicator or disable a button:
.structr-action-running {
    opacity: 0.5;
    pointer-events: none;
}

.structr-action-running::after {
    content: ' Loading...';
}
Advanced Example
The examples earlier in this chapter show simple forms that map input fields to primitive properties like strings and dates. In practice, most forms also need to set relationships to other objects. This section shows how to build a form that handles all four relationship cardinalities.
The Data Model
The example uses a project management scenario with the following types and relationships:
| Type | Relationship | Target Type | Cardinality | Meaning |
|---|---|---|---|---|
| Project | manager | Employee | many-to-one | Each project has one manager, but an employee can manage multiple projects. |
| Project | client | Client | one-to-one | Each project has exactly one client, and each client has exactly one project. |
| Project | tags | Tag | many-to-many | A project can have multiple tags, and a tag can be assigned to multiple projects. |
| Project | tasks | Task | one-to-many | A project has multiple tasks, but each task belongs to exactly one project. |
How Relationship Properties Work in Forms
To set a relationship property in a form, you pass the UUID of the related object as the parameter value. Structr uses the UUID to find the target object and creates or updates the relationship.
For to-one relationships (many-to-one and one-to-one), you pass a single UUID. A <select> element is the natural choice here because the user picks one item from a list. Each <option> has the UUID of a related object as its value.
For to-many relationships (one-to-many and many-to-many), you pass multiple UUIDs. A <select> element with the multiple attribute is the natural choice here. Each <option> has the UUID of a related object as its value, and the browser collects all selected values into an array.
Structr manages relationships completely. When you submit the form, Structr sets the relationship to exactly the objects you pass. Old relationships that are no longer in the submitted data are removed automatically.
The Form
The following form contains relationship selectors for all four cardinalities on a Project. The page is accessible at /advanced/{id} where {id} is the project’s UUID.
<form id="advanced-project-form">
    <label>
        <span>Manager</span>
        <select name="manager">
            <!-- repeater: find('Employee'), data key: employee -->
            <option value="${employee.id}">
                ${employee.name}
            </option>
        </select>
    </label>
    <label>
        <span>Client</span>
        <select name="client">
            <!-- repeater: find('Client'), data key: client -->
            <option value="${client.id}">
                ${client.name}
            </option>
        </select>
    </label>
    <label>
        <span>Tags</span>
        <select name="tags" multiple>
            <!-- repeater: find('Tag'), data key: tag -->
            <option value="${tag.id}">
                ${tag.name}
            </option>
        </select>
    </label>
    <label>
        <span>Tasks</span>
        <select name="tasks" multiple>
            <!-- repeater: find('Task'), data key: task -->
            <option value="${task.id}">
                ${task.name}
            </option>
        </select>
    </label>
    <button type="submit">Save Project</button>
</form>
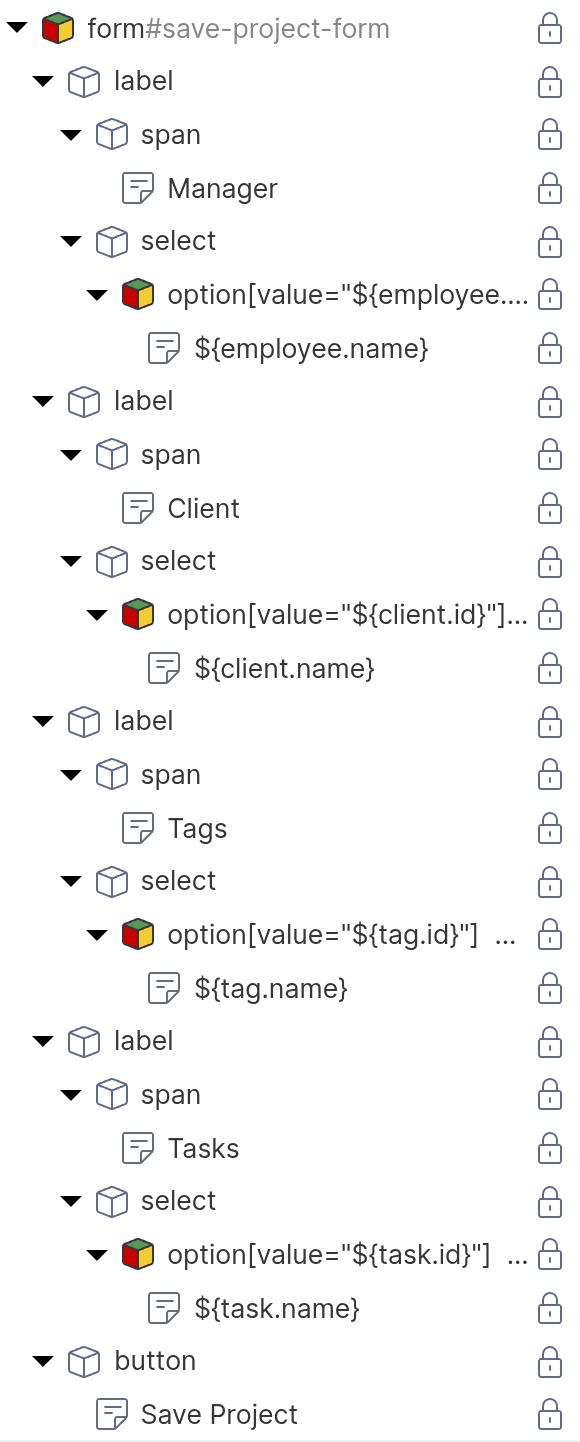
Each <option> element is configured as a repeater that iterates over the available objects of the respective type. The HTML shows only one <option> per <select>, but at runtime, the repeater produces one option for each object returned by its function query. For details on repeaters and function queries, see the Dynamic Content chapter.
Configuring the Event Action Mapping
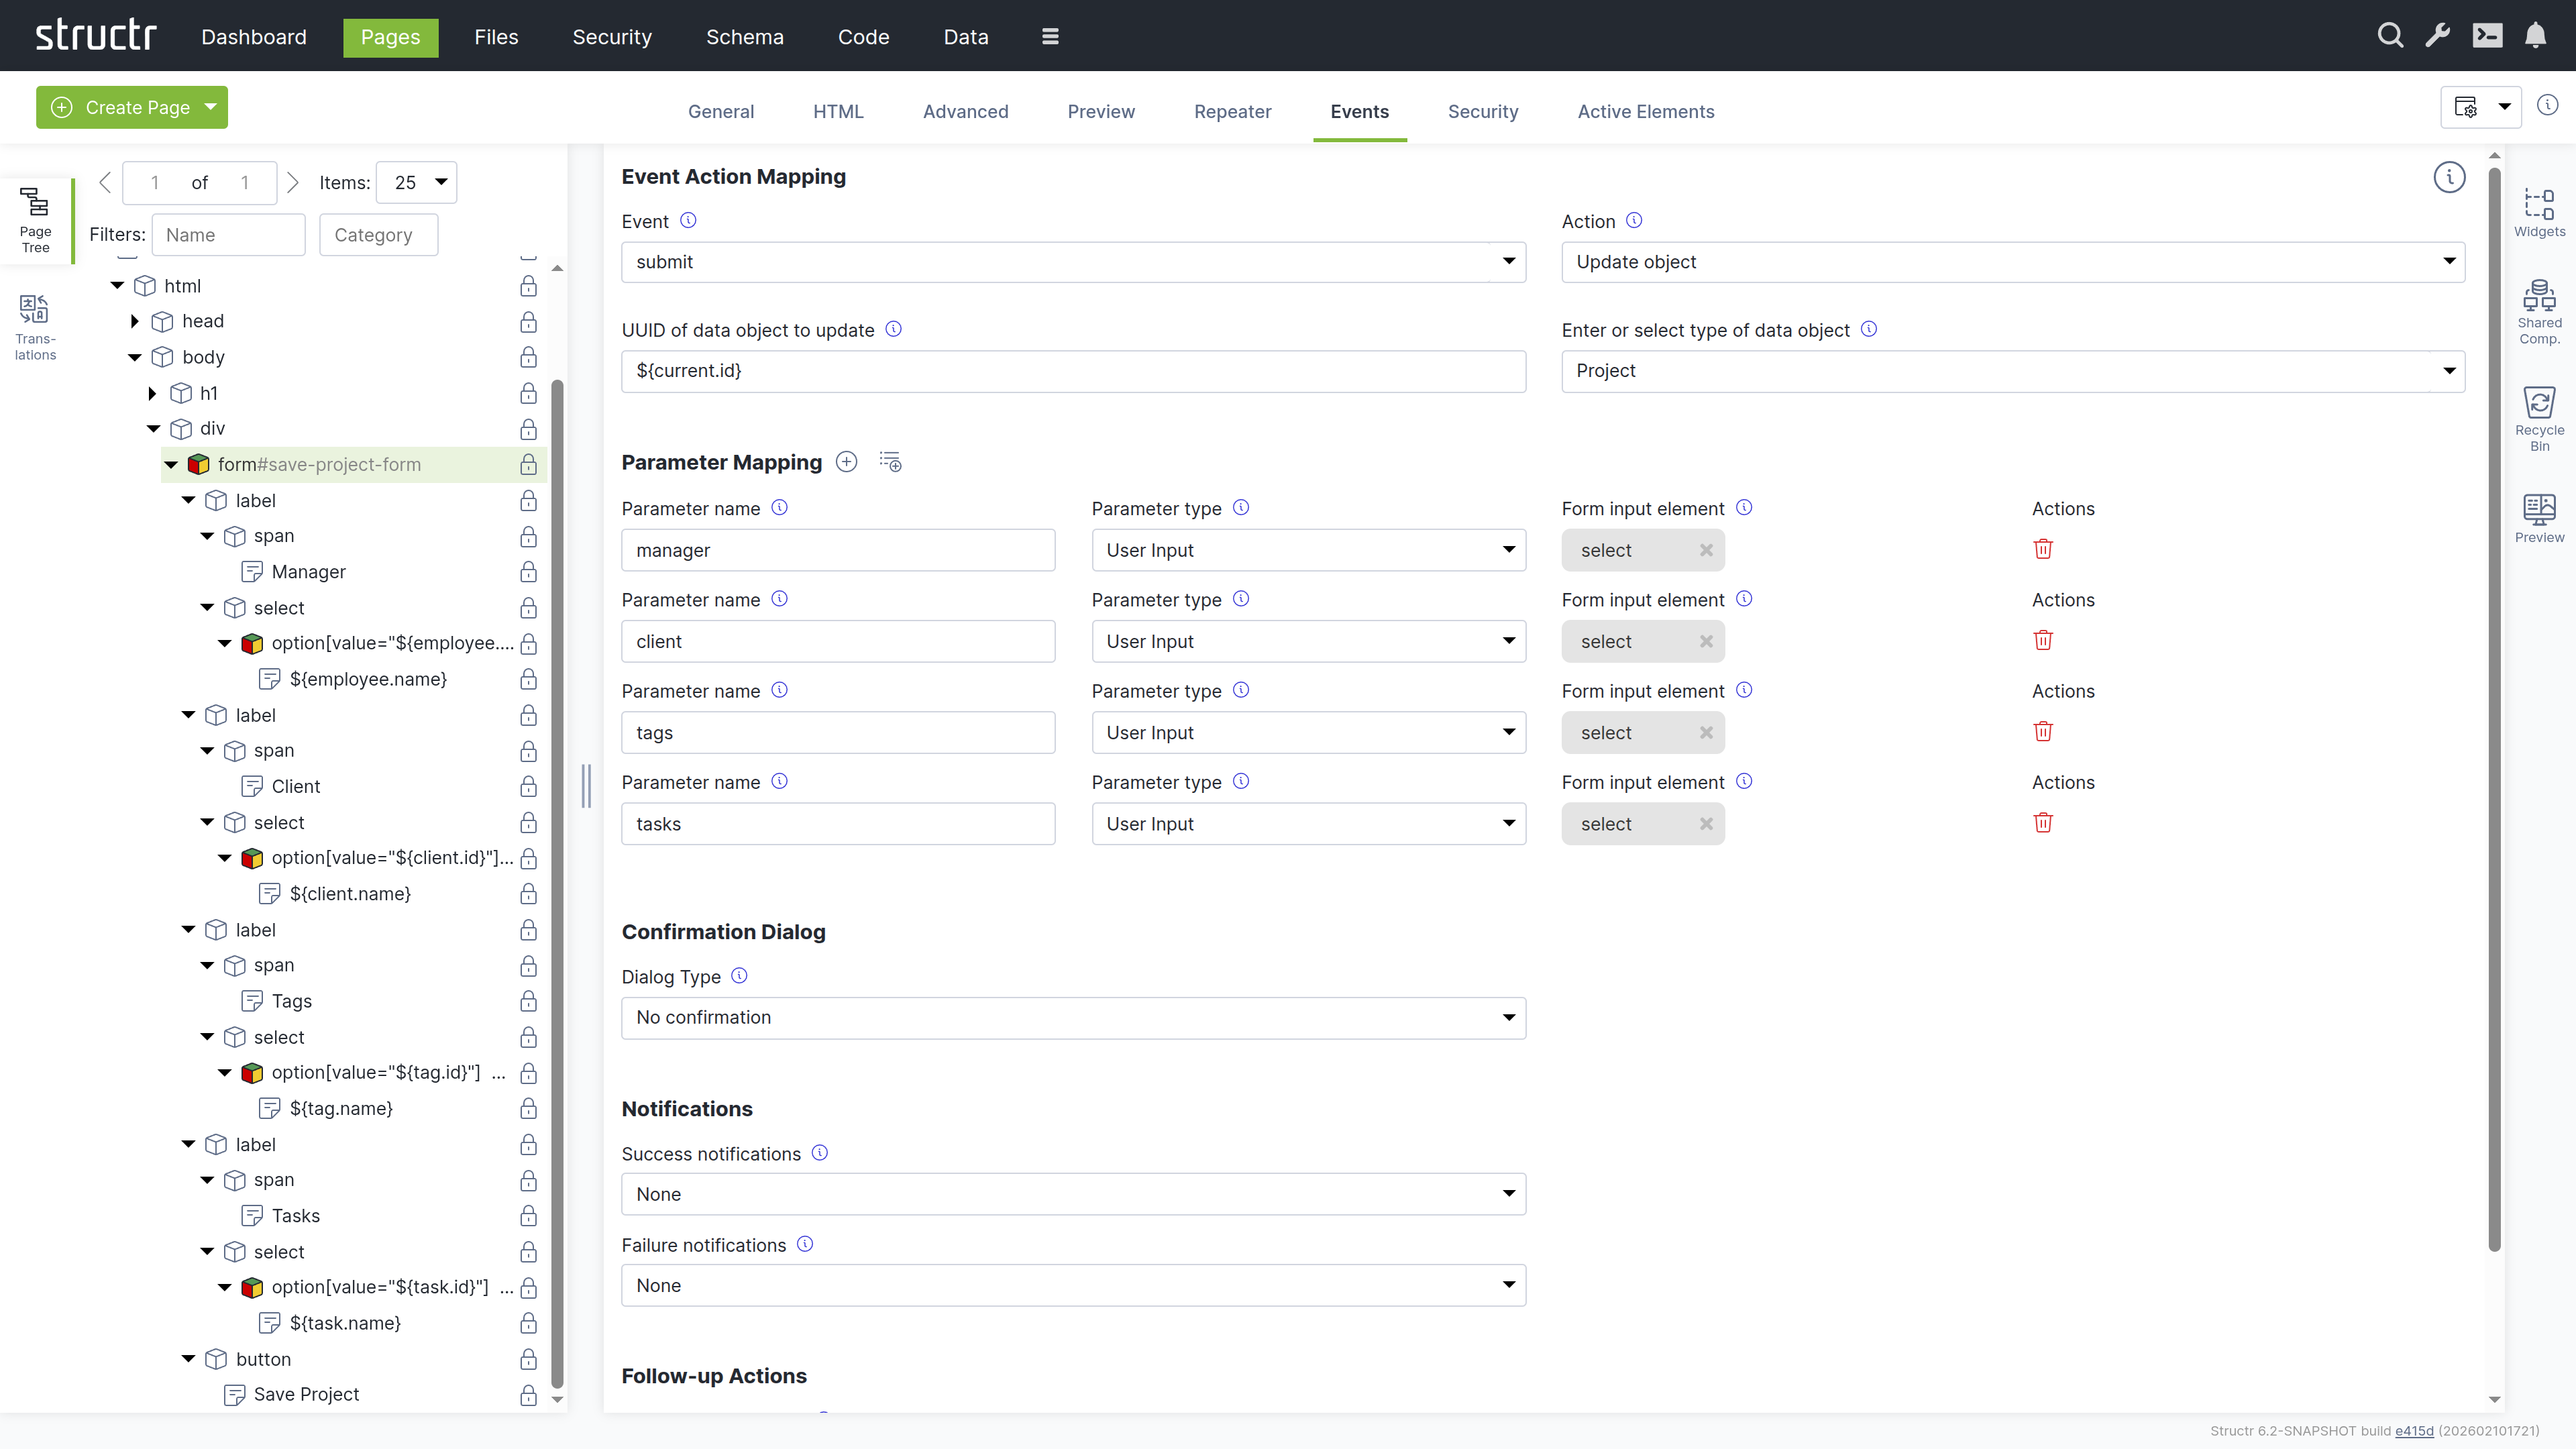
Select the form element in the page tree and configure the Event Action Mapping:
- Set the Event to
submit. - Select “Update object” as the Action.
- In the UUID field, enter
${current.id}. - In the type field, enter
Project. - Under Parameter Mapping, add a parameter for each property:
| Parameter Name | Parameter Type | Mapped Element | Purpose |
|---|---|---|---|
| manager | User Input | manager select | To-one: sends one UUID |
| client | User Input | client select | To-one: sends one UUID |
| tags | User Input | tags select | To-many: sends array of UUIDs |
| tasks | User Input | tasks select | To-many: sends array of UUIDs |
- Under Behavior on Success, select “Reload the current page”.
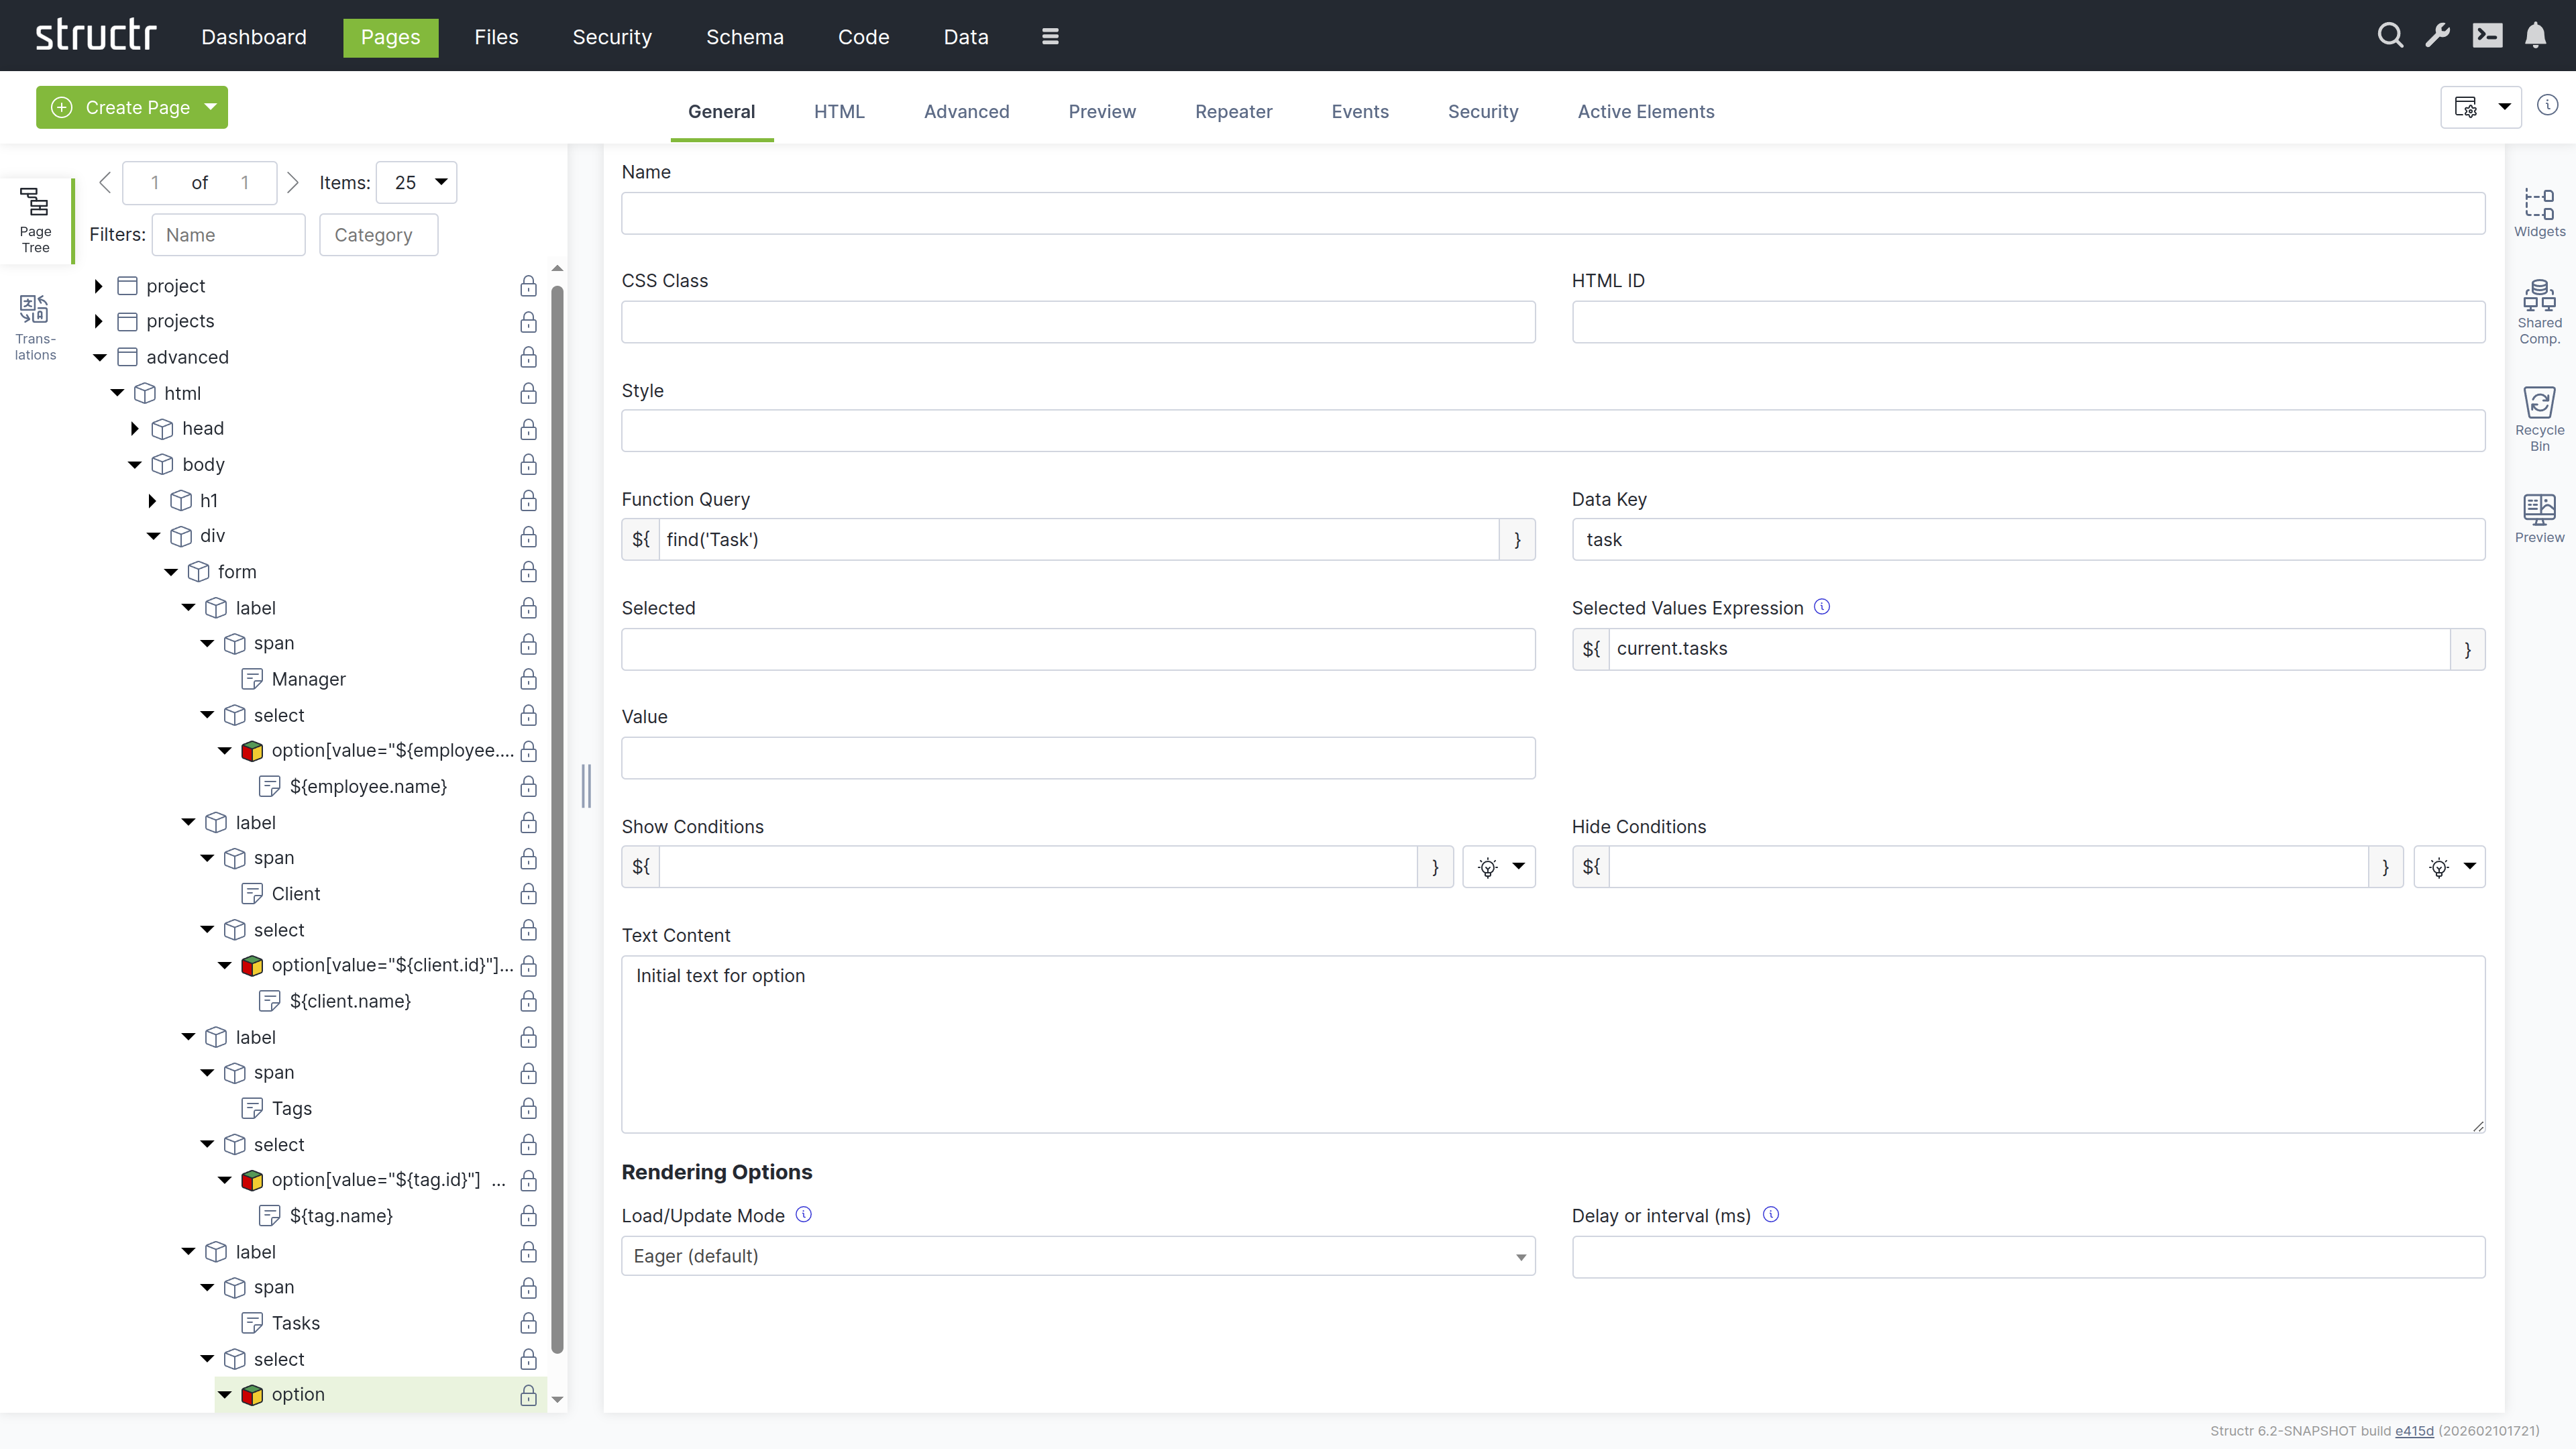
The Action Mapping configuration looks like this:
Each <option> element needs to know whether it should be pre-selected when the form loads. As described earlier in this chapter, Structr provides the Selected Values Expression field on the General tab of <option> elements for this purpose. The field contains a template expression that resolves to the current value of the property, for example current.manager or current.tags. Structr compares each option’s value attribute against the result and sets the selected attribute on matching options.
What Happens for Each Cardinality
Many-to-One (Manager)
The <select> element contains one <option> per employee. The repeater iterates over all employees and renders an option for each one. When the user selects a manager and submits the form, Structr receives the UUID of the selected employee and sets the manager relationship on the project. If a manager was previously set, the old relationship is removed and replaced with the new one.
The Selected Values Expression field on the <option> element is set to current.manager. Structr compares each employee’s UUID against the current manager and sets the selected attribute on the matching option, so the current manager is pre-selected when the form loads.
One-to-One (Client)
From a form perspective, one-to-one works the same as many-to-one. The user selects a single client from a dropdown, and Structr sets the relationship. The Selected Values Expression field is set to current.client. The difference is in the data model constraint: since the relationship is one-to-one, assigning a client to this project automatically removes that client from any other project it was previously assigned to. This enforcement happens on the server side and requires no special handling in the form.
Many-to-Many (Tags)
Each tag is rendered as an <option> inside a <select multiple> element by a repeater. When the form is submitted, the browser collects the values of all selected options, and Structr receives them as an array of UUIDs. Structr then sets the tags relationship to exactly these objects, adding new relationships and removing any that are no longer in the array.
The Selected Values Expression field on the <option> element is set to current.tags. Structr checks whether each tag is contained in the project’s current tags collection and marks the matching options as selected.
One-to-Many (Tasks)
The <select multiple> element lists all available tasks. The repeater iterates over all tasks, and the Selected Values Expression field on the <option> element is set to current.tasks. Structr checks whether each task is in the project’s current tasks collection and marks the matching options as selected. When the form is submitted, Structr receives the array of selected task UUIDs and updates the tasks relationship. Since each task can only belong to one project, assigning a task to this project automatically removes it from its previous project.
For one-to-many relationships, the inline creation pattern described earlier in the “Creating Related Objects Inline” section is often a simpler alternative to the multi-select approach shown here.